Visual Studio 통합 개발 환경은 코드를 편집, 디버그 및 빌드한 다음, 앱을 게시하는 데 사용할 수 있는 창의적인 실행 패드입니다.IDE(통합 개발 환경)는 소프트웨어 개발의 다양한 측면에서 사용할 수 있는 다양한 기능을 갖춘 프로그램입니다. Visual Studio는 대부분의 IDE가 제공하는 표준 편집기 및 디버거로서 뿐만 아니라, 컴파일러와 코드 완성 도구, 그래픽 디자이너를 비롯해 소프트웨어 개발 프로세스를 쉽게 만들어 주는 많은 기능을 포함하고 있습니다.

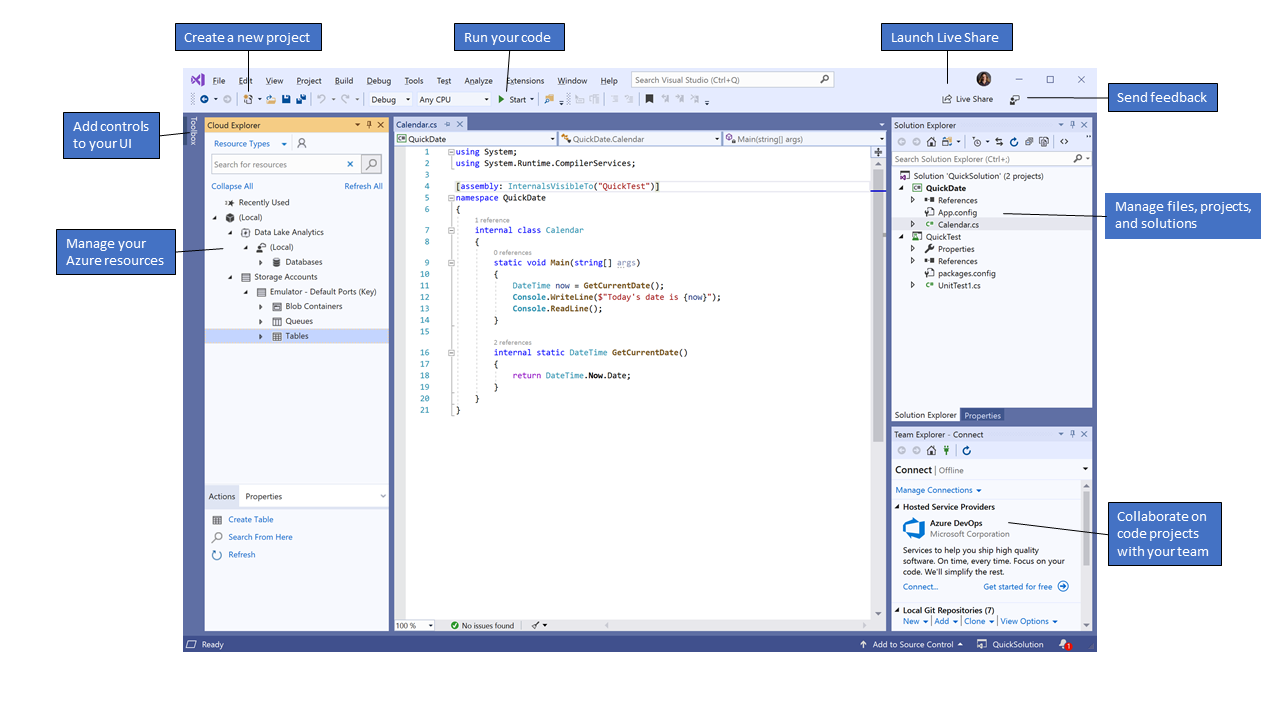
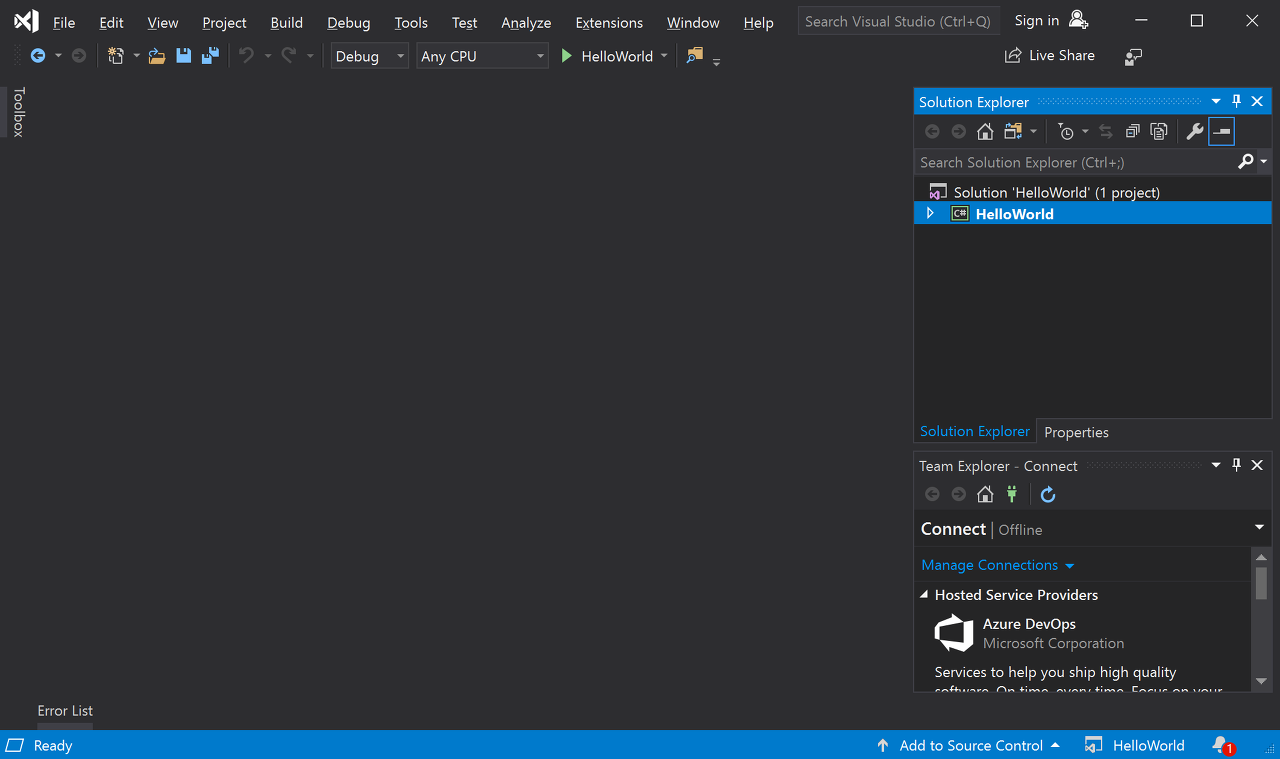
이 이미지는 프로젝트와 사용할 만한 몇 가지 주요 도구 창이 열려 있는 Visual Studio를 보여줍니다.

  • 솔루션 탐색기(오른쪽 위) - 코드 파일을 보고, 탐색하고, 관리할 수 있습니다. 솔루션 탐색기에서 파일을 솔루션 및 프로젝트로 그룹화하여 코드를 구성할 수 있습니다.

  • 편집기 창(가운데) - 대부분 작업을 수행하는 곳으로 파일 콘텐츠가 표시됩니다. 코드를 편집하거나 단추 및 텍스트 상자를 사용하여 창과 같은 사용자 인터페이스를 디자인할 수 있습니다.

버전

Visual Studio는 Windows 및 Mac에서 사용할 수 있습니다. Mac용 Visual Studio에는 Visual Studio 2019와 동일한 기능이 많이 있으며 플랫폼 간 앱 및 모바일 앱 개발에 최적화되어 있습니다. 이 문서에서는 Windows 버전의 Visual Studio 2019에 중점을 둡니다.

세 가지 Visual Studio 2019 버전은 다음과 같습니다. Community, Professional 및 Enterprise. 각 버전에서 지원되는 기능에 대해 알아보려면 Visual Studio IDE 비교를 참조하세요.

소프트웨어를 개발할 때 생산성을 높이는 데 도움이 되는 Visual Studio에서 인기 있는 기능 몇 가지는 다음과 같습니다.

  • 오류 표시선 및 빠른 작업

    오류 표시선은 물결 모양의 밑줄로, 입력할 때 코드의 오류 또는 잠재적인 문제를 알려줍니다. 이러한 시각적 단서를 사용하면 빌드하는 동안이나 프로그램을 실행할 때 오류가 검색될 때까지 기다리지 않고 즉시 문제를 해결할 수 있습니다. 오류 표시선 위로 마우스를 가져가면 오류에 대한 추가 정보가 표시됩니다. 오류를 수정하기 위한 작업(빠른 작업이라고 함)과 함께 전구가 왼쪽 여백에 나타날 수도 있습니다.
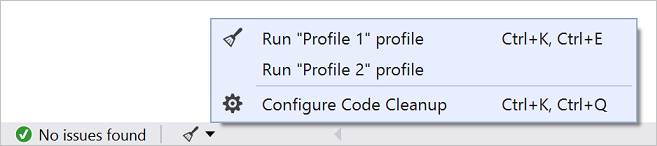
  • 코드 정리

    단추를 클릭하여 코드 형식을 지정하고 코드 스타일 설정, .editorconfig 규칙  Roslyn 분석기에서 제안하는 코드 수정 사항을 적용합니다. 코드 정리는 코드 검토로 이동하기 전에 코드의 문제를 해결하는 데 도움이 됩니다. (현재 C# 코드에만 사용할 수 있습니다.)

  • 리팩터링

    리팩터링에는 변수의 지능형 이름 바꾸기, 새 메서드로 코드 줄을 하나 이상 추출, 메서드 매개 변수의 순서 변경 등과 같은 작업이 포함됩니다.

  • IntelliSense

    IntelliSense는 편집기에서 직접 코드에 대한 정보를 표시하고 경우에 따라 약간의 코드를 작성하는 기능 집합에 대한 용어입니다.IntelliSense는 다른 곳에서 형식 정보를 조회할 필요가 없도록 기본 설명서를 편집기에 인라인으로 포함하는 것과 같습니다.IntelliSense 기능은 언어에 따라 달라집니다. 자세한 내용은 C# IntelliSense, Visual C++ IntelliSense, JavaScript IntelliSense  Visual Basic IntelliSense를 참조하세요. 다음 그림에서는 IntelliSense에서 형식에 대한 멤버 목록을 표시하는 방법을 보여 줍니다.
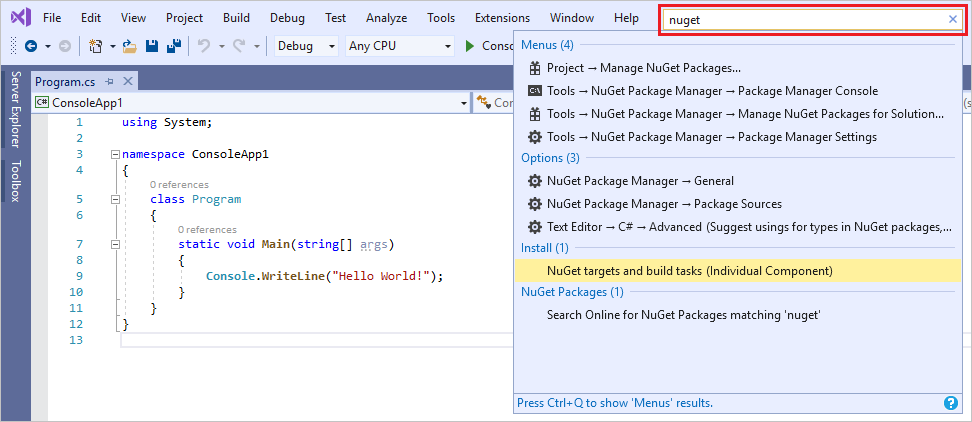
  • 검색 상자

    Visual Studio는 메뉴, 옵션 및 속성이 매우 다양하여 때때로 버거울 수도 있습니다. 검색 상자는 Visual Studio에서 필요한 항목을 빠르게 찾을 수 있는 좋은 방법입니다. 찾으려는 이름을 입력하기만 하면 Visual Studio는 원하는 곳으로 정확하게 안내하는 결과를 나열합니다. 예를 들어 다른 프로그래밍 언어를 위한 지원을 추가하도록 Visual Studio에 기능을 추가하는 경우 검색 상자를 사용하면 워크로드 또는 개별 구성 요소를 설치하도록 Visual Studio 설치 관리자가 열립니다.


    검색 상자에 대한 바로 가기는 Ctrl+Q를 누릅니다.

  • Live Share

    앱 유형 또는 프로그래밍 언어와 관계없이 다른 사람과 공동으로 실시간 편집 및 디버그를 수행할 수 있습니다. 프로젝트를 즉시 안전하게 공유하고, 필요에 따라 디버깅 세션, 터미널 인스턴스, localhost 웹앱, 음성 통화 등을 공유할 수 있습니다.

  • 호출 계층 구조

    호출 계층 구조 창은 선택한 메서드를 호출하는 방법을 보여 줍니다. 이는 메서드를 변경하거나 제거하려고 하거나 버그를 추적하려는 경우 유용한 정보가 됩니다.

  • CodeLens

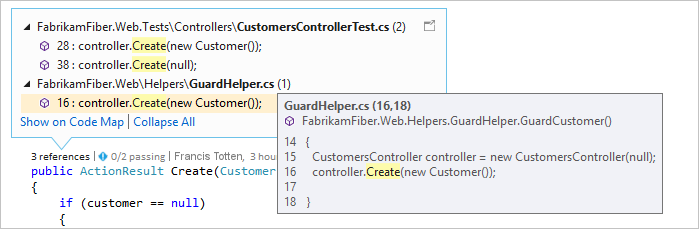
    CodeLens를 사용하면 편집기 내에서 코드 참조, 코드 변경 내용, 연결된 버그, 작업 항목, 코드 검토 및 단위 테스트를 확인할 수 있습니다.

  • 정의로 이동

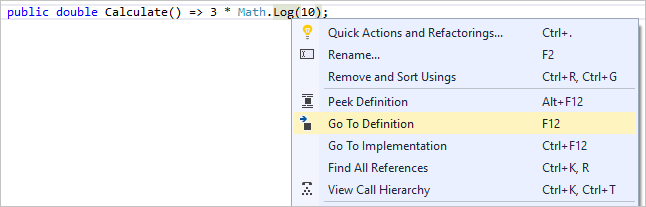
    정의로 이동 기능은 함수 또는 형식이 정의된 위치로 직접 이동합니다.

  • 정의 피킹(Peeking)

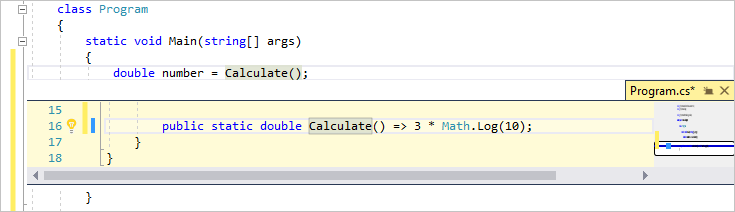
    정의 보기 창은 실제로 개별 파일을 열지 않고 메서드 또는 형식의 정의 보여 줍니다.

Visual Studio IDE 설치

이 섹션에서는 Visual Studio로 할 수 있는 몇 가지 작업을 시도해 볼 간단한 프로젝트를 만듭니다. 코딩 지원 기능인 IntelliSense를 사용하고, 앱을 디버그하여 프로그램을 실행하는 동안 변수 값이 표시되도록 하고, 색 테마를 변경합니다.

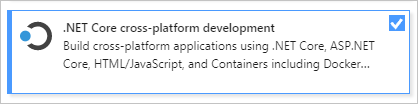
시작하려면 Visual Studio를 다운로드하여 시스템에 설치합니다. 모듈식 설치 관리자를 사용하면 선호하는 프로그래밍 언어 또는 플랫폼에 필요한 기능 그룹인 워크로드를 선택하여 설치할 수 있습니다. 프로그램 생성 단계를 수행하려면 설치 중에 .NET Core 플랫폼 간 개발 워크로드를 선택해야 합니다.

Visual Studio를 처음 열면 필요에 따라 Microsoft 계정이나 회사 또는 학교 계정으로 로그인할 수 있습니다.

프로그램 만들기

이제 본격적으로 간단한 프로그램을 만들어 보겠습니다.

  1. Visual Studio를 엽니다.

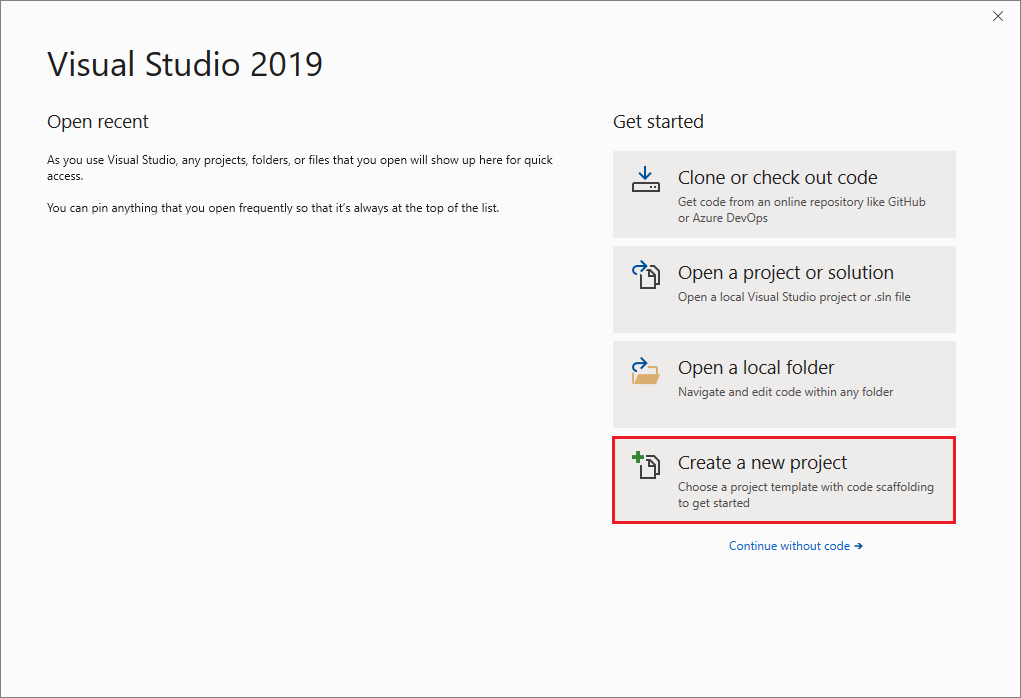
    리포지토리 복제, 최근 프로젝트 열기 또는 새 프로젝트 만들기에 대한 다양한 옵션이 포함되어 있는 시작 창이 표시됩니다.

  2. 새 프로젝트 만들기를 선택합니다.

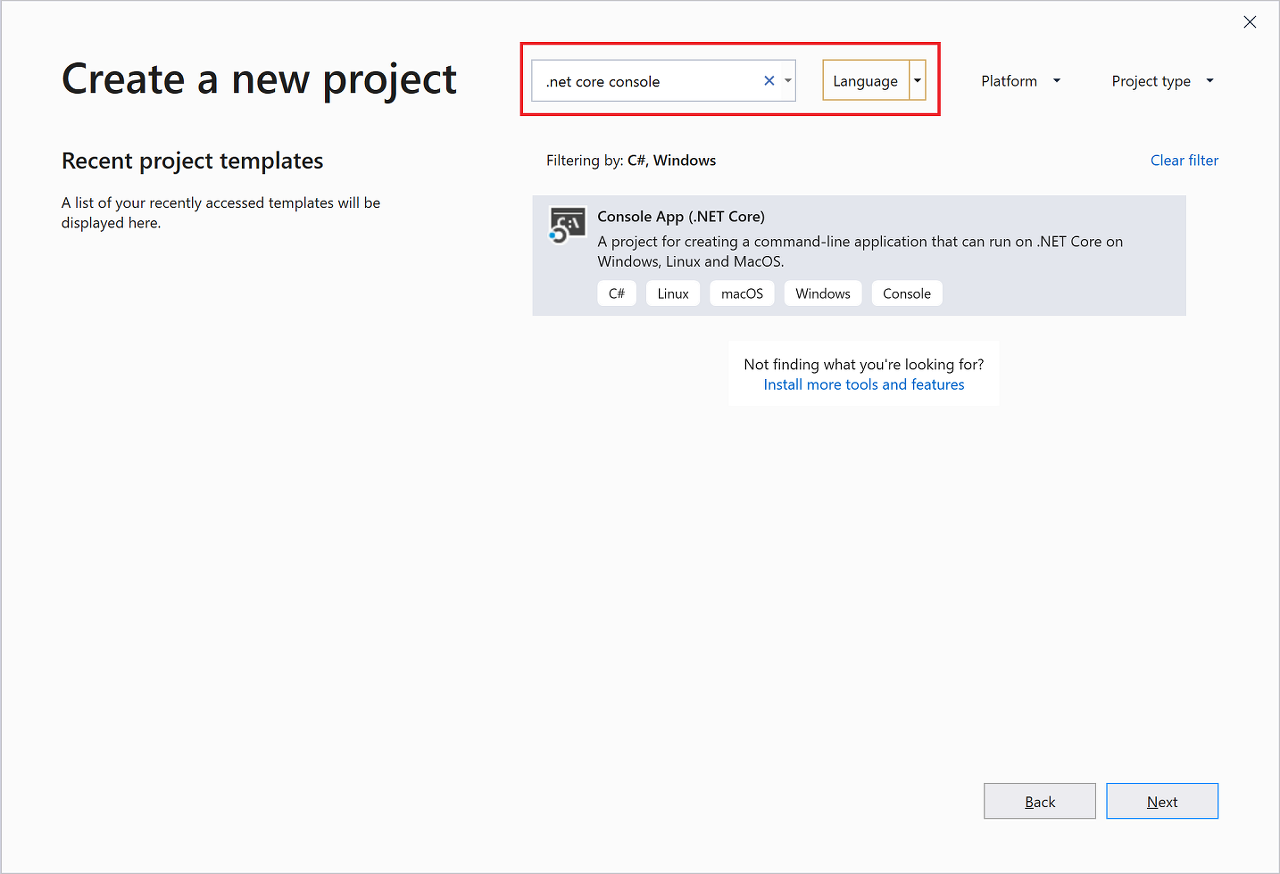
    새 프로젝트 만들기 창이 열리고 여러 프로젝트 템플릿이 표시됩니다. 템플릿에는 지정된 프로젝트 형식에 필요한 기본 파일과 설정이 포함되어 있습니다.

  3. 원하는 템플릿을 찾으려면 검색 상자에 .net core console을 입력합니다. 입력한 키워드에 따라 사용 가능한 템플릿 목록이 자동으로 필터링됩니다. 언어 드롭다운 목록에서 C# 를 선택하여 추가로 템플릿 결과를 필터링할 수 있습니다. 콘솔 앱(.NET Core) 템플릿을 선택하고 다음을 선택합니다.

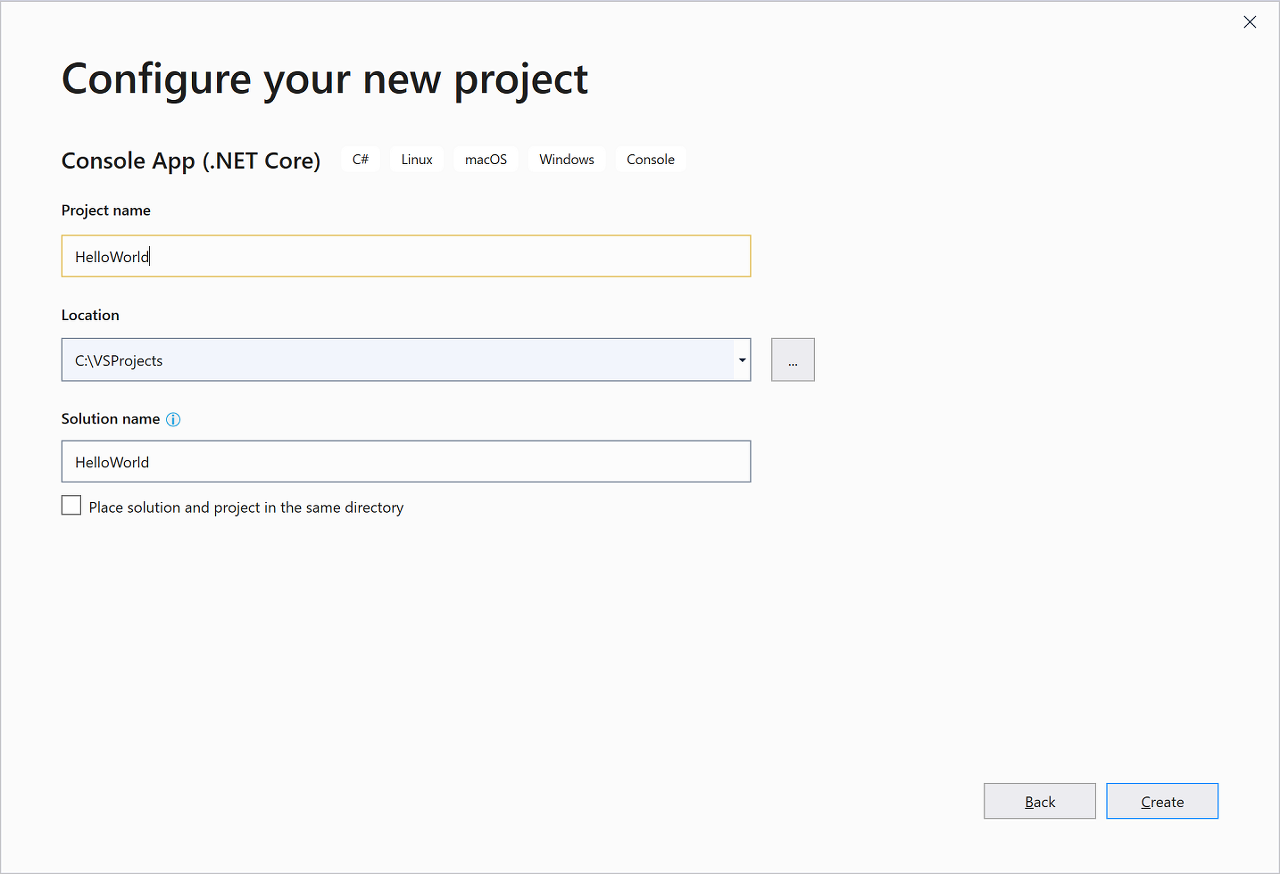
  4. 새 프로젝트 구성 창에서 프로젝트 이름 상자에 HelloWorld를 입력하고, 필요에 따라 프로젝트 파일의 디렉터리 위치를 변경한 다음, 만들기를 선택합니다.

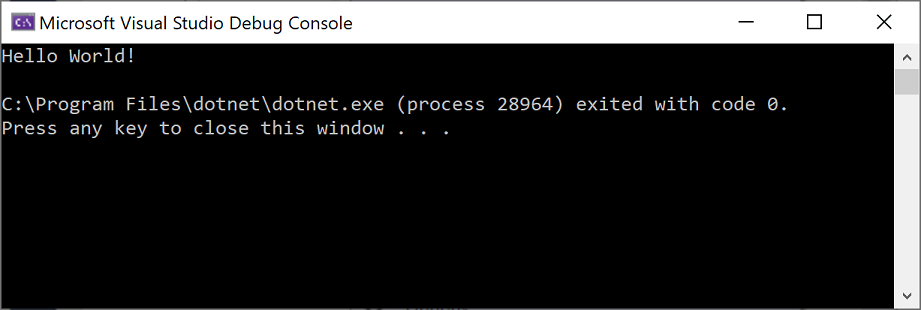
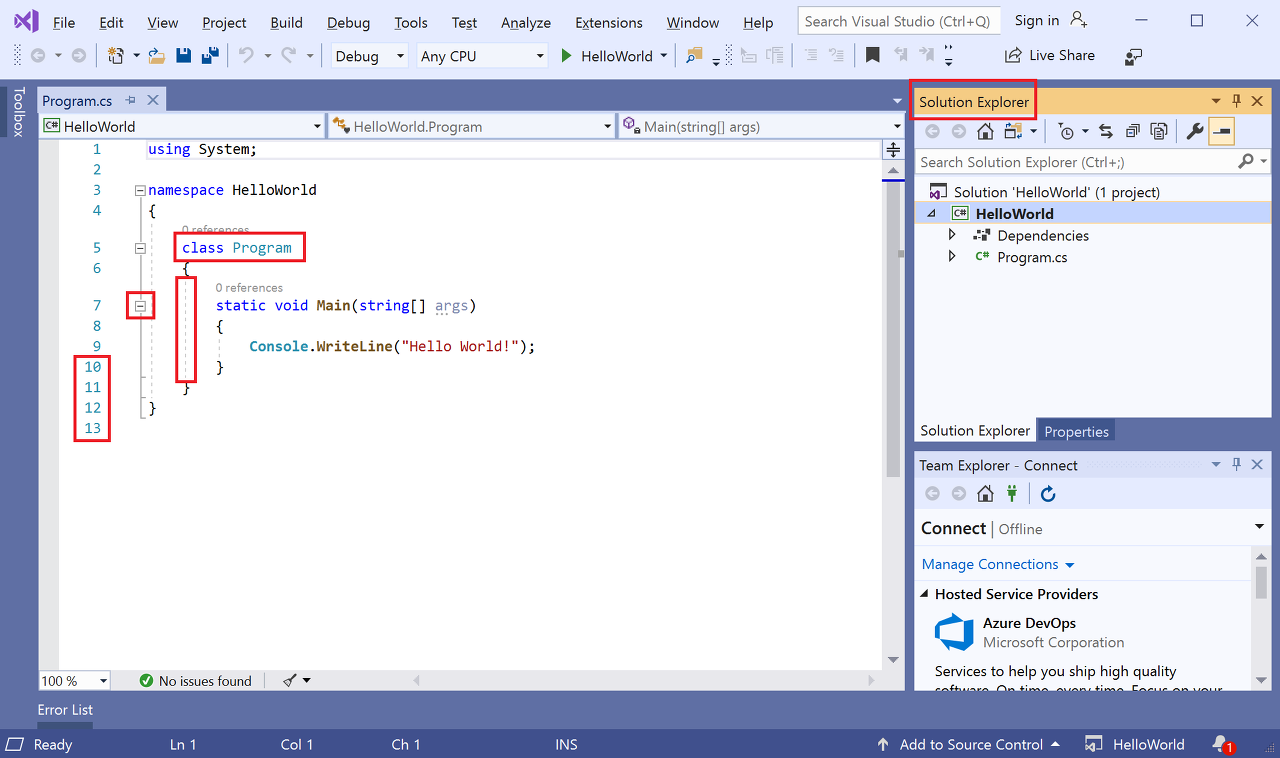
    Visual Studio가 프로젝트를 만듭니다. 이 프로젝트는 Console.WriteLine() 메서드를 호출하여 리터럴 문자열 “Hello World!”를 표시하는 간단한 “Hello World” 애플리케이션입니다. 콘솔(프로그램 출력) 창에서

    잠시 후 다음과 같은 정보가 표시됩니다.

    애플리케이션의 C# 코드는 대부분의 공간을 차지하는 편집기 창에 표시됩니다. 텍스트는 지정된 색으로 자동으로 표시되어 다른 부분(예: 키워드 또는 형식)을 나타냅니다. 또한 코드에서 작은 세로 파선은 서로 일치하는 중괄호를 나타내며, 줄 번호는 나중에 코드를 찾는 데 도움이 됩니다. 작은 상자 안에 있는 빼기 기호를 선택하여 코드 블록을 축소하거나 확장할 수 있습니다. 이 코드 개요 기능을 사용하면 필요 없는 코드를 숨길 수 있으므로 화면 상의 혼란을 최소화할 수 있습니다. 프로젝트 파일은 솔루션 탐색기라는 창의 오른쪽에 나열됩니다.

    다른 메뉴와 도구 창을 사용할 수 있지만 지금은 넘어가겠습니다.

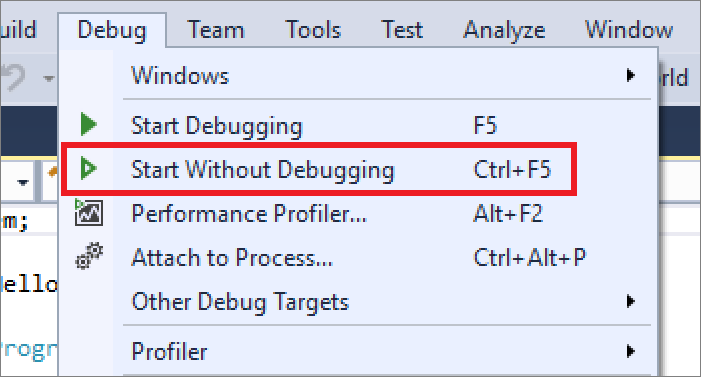
  5. 이제 앱을 시작합니다. 메뉴 모음의 디버그 메뉴에서 디버깅하지 않고 시작을 선택하면 됩니다. Ctrl+F5를 누를 수도 있습니다.

    Visual Studio에서 앱을 빌드하며, 콘솔 창이 열리고 Hello World! 메시지가 표시됩니다. 이제 실행 중인 앱이 있습니다!

  6. 콘솔 창을 닫으려면 키보드에서 아무 키나 누릅니다.

  7. 앱에 일부 코드를 추가하겠습니다. Console.WriteLine("Hello World!"); 줄 앞에 다음 C# 코드를 추가합니다.

    C#복사

    Console.WriteLine("\nWhat is your name?"); var name = Console.ReadLine();

    이 코드는 콘솔 창에 이름이 무엇입니까? 를 표시한 다음, 사용자가 텍스트를 입력한 후 Enter 키를 누를 때까지 기다립니다.

  8. Console.WriteLine("Hello World!");이라고 표시된 줄을 다음 코드로 변경합니다.

    C#복사

    Console.WriteLine($"\nHello {name}!");
  9. 디버그 > 디버깅 없이 시작을 선택하거나 Ctrl+F5를 눌러 앱을 다시 실행합니다.

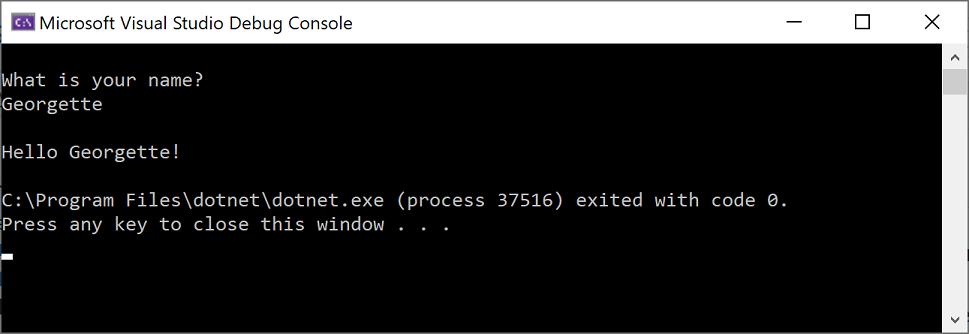
    Visual Studio에서 앱을 다시 빌드하고, 콘솔 창이 열리며 사용자 이름을 묻는 메시지가 표시됩니다.

  10. 콘솔 창에 이름을 입력하고 Enter 키를 누릅니다.

  11. 아무 키나 눌러 콘솔 창을 닫고 실행 중인 프로그램을 중지합니다.

리팩터링 및 IntelliSense 사용

리팩터링  IntelliSense로 더 효율적으로 코딩하는 데 도움이 되는 몇 가지 방법을 살펴보겠습니다.

먼저 name 변수의 이름을 변경합니다.

  1. name 변수를 두 번 클릭하여 선택합니다.

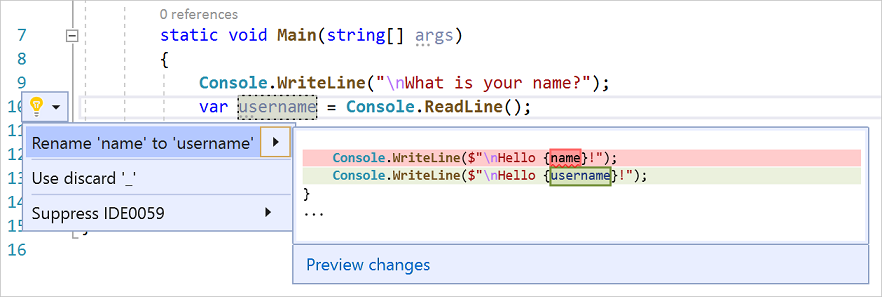
  2. 변수의 새 이름 username을 입력합니다.

    변수 주위에 회색 상자가 나타나고 여백에 전구가 나타납니다.

  1. 전구 아이콘을 선택하여 사용 가능한 빠른 작업을 표시합니다. 'name'의 이름을 'username'으로 바꾸기를 선택합니다.

    프로젝트 전체에서 변수의 이름이 변경됩니다. 이 경우에는 두 군데밖에 없습니다.

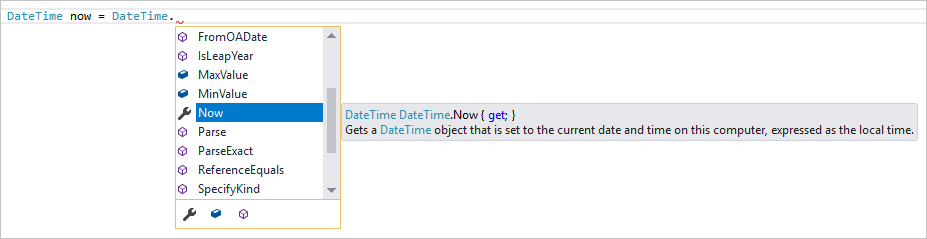
  1. 이제 IntelliSense를 살펴보겠습니다. Console.WriteLine($"\nHello {username}!");이라고 표시된 줄 아래에 DateTime now = DateTime.을 입력합니다.

    상자에 DateTime 클래스의 멤버가 표시됩니다. 또한 현재 선택된 멤버의 설명이 별도 상자에 표시됩니다.

  2. 클래스의 속성인 Now라는 멤버를 두 번 클릭하거나 Tab 키를 눌러 선택합니다. 끝에 세미콜론을 추가하여 코드 줄을 완성합니다.

  3. 그 아래에 다음 코드 줄을 입력하거나 붙여넣습니다.

    C#복사

    int dayOfYear = now.DayOfYear; Console.Write("Day of year: "); Console.WriteLine(dayOfYear);


    Console.Write은 인쇄 후 줄 종결자를 추가하지 않는다는 점에서 Console.WriteLine과 약간 다릅니다. 즉, 출력으로 전송되는 다음 텍스트가 같은 줄에 인쇄됩니다. 코드에서 이러한 각 메서드 위로 마우스를 가져가면 설명을 볼 수 있습니다.

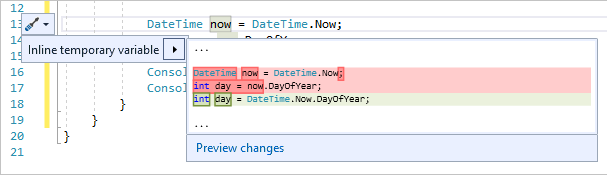
  4. 다음으로, 리팩터링을 다시 사용하여 코드를 좀 더 간결하게 만듭니다. DateTime now = DateTime.Now; 줄에서 변수 now를 클릭합니다.

    해당 줄의 여백에 작은 스크루드라이버 아이콘이 나타납니다.

  5. 스크루드라이버 아이콘을 클릭하면 Visual Studio에서 제안하는 사항을 볼 수 있습니다. 여기에는 코드의 전체 동작을 변경하지 않고 코드 줄을 제거할 수 있는 인라인 임시 변수 리팩터링이 표시되어 있습니다.

  6. 인라인 임시 변수를 클릭하여 코드를 리팩터링합니다.

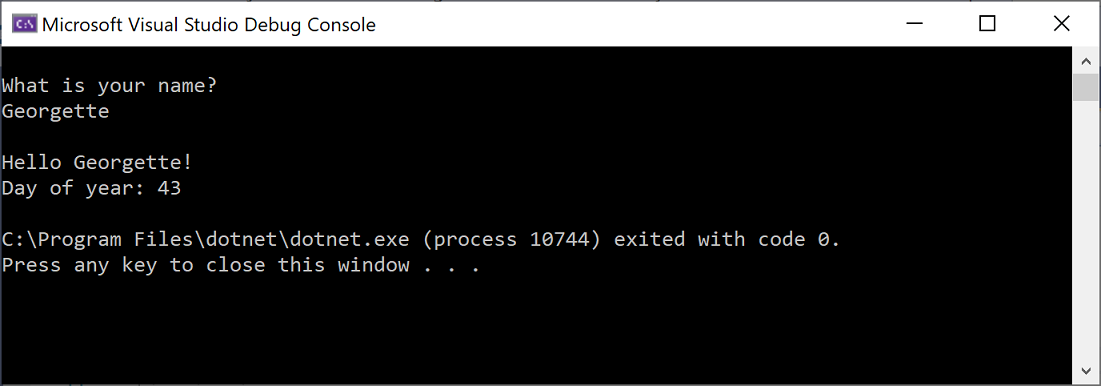
  1. Ctrl+F5 키를 눌러 프로그램을 다시 실행합니다. 출력은 다음과 같습니다.

코드 디버그

코드를 작성할 때 코드를 실행하고 버그를 테스트해야 합니다. Visual Studio의 디버깅 시스템을 사용하면 코드를 단계별로 진행하면서 명령문을 한 번에 하나씩 실행하면서 변수를 검사할 수 있습니다. 특정 줄에서 코드의 실행을 중지하는 중단점을 설정할 수 있습니다.코드를 실행함에 따라 변수의 값이 변경되는 방법 등을 확인할 수 있습니다.

중단점을 설정하여 프로그램이 "이동 중"일 때 username 변수의 값을 확인하겠습니다.

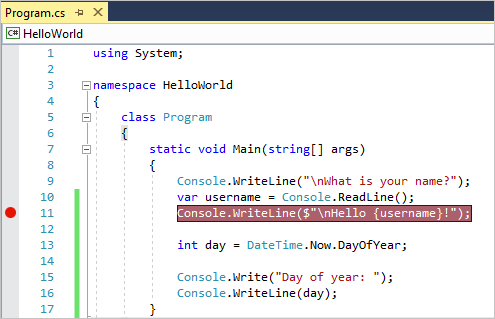
  1. Console.WriteLine($"\nHello {username}!");이라고 표시된 코드 줄을 찾습니다. 이 코드 줄에 중단점을 설정하려면, 즉 이 줄에서 프로그램이 실행을 일시 중지하도록 하려면 편집기의 맨 왼쪽 여백을 클릭합니다. 코드 줄의 아무 곳이나 클릭한 다음, F9 키를 누를 수도 있습니다.

    맨 왼쪽 끝에 빨간색 원이 표시되고 코드가 빨간색으로 강조 표시됩니다.

  2. 디버그 > 디버깅 시작을 선택하거나 F5 키를 눌러 디버깅을 시작합니다.

  3. 콘솔 창이 나타나고 사용자 이름을 묻는 메시지가 표시되면 입력하고 Enter 키를 누릅니다.

    Visual Studio 코드 편집기로 포커스가 돌아오고 중단점이 있는 코드 줄이 노란색으로 강조 표시됩니다. 이는 프로그램이 실행할 다음 코드 줄을 의미합니다.

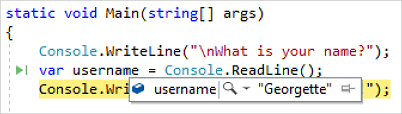
  4. 마우스를 username 변수 위로 가져가면 해당 값을 볼 수 있습니다. 또는 username을 마우스 오른쪽 단추로 클릭하고 조사식 추가를 선택하여 변수를 조사식 창에 추가할 수 있습니다. 이 창에서 해당 값을 볼 수도 있습니다.

  5. 프로그램 실행을 완료하려면 F5 키를 다시 누릅니다.

Visual Studio의 디버깅에 대한 자세한 내용은 디버거 기능 둘러보기를 참조하세요.

Visual Studio 사용자 지정

기본 색 테마 변경을 비롯하여 Visual Studio 사용자 인터페이스를 꾸밀 수 있습니다. 어둡게 테마로 변경하려면:

  1. 메뉴 모음에서 도구 > 옵션을 선택하여 옵션 대화 상자를 엽니다.
  1. 환경 > 일반 옵션 페이지에서 색 테마 선택을 어둡게로 변경하고 확인을 선택합니다.

    전체 IDE의 색 테마가 어둡게로 변경됩니다.

IDE를 개인 설정할 수 있는 다른 방법을 배우려면 Visual Studio 개인 설정을 참조하세요.

다음 단계

이러한 소개 아티클 중 하나와 함께 다음을 수행하여 Visual Studio를 추가로 탐색합니다.

자세한 코딩을 살펴보려는 경우 다음과 같은 언어별 빠른 시작 중 하나를 진행하는 것이 좋습니다.

참고 항목

The Visual Studio integrated development environment is a creative launching pad that you can use to edit, debug, and build code, and then publish an app. An integrated development environment (IDE) is a feature-rich program that can be used for many aspects of software development. Over and above the standard editor and debugger that most IDEs provide, Visual Studio includes compilers, code completion tools, graphical designers, and many more features to ease the software development process.


This image shows Visual Studio with an open project and several key tool windows you'll likely use:

  • Solution Explorer (top right) lets you view, navigate, and manage your code files. Solution Explorer can help organize your code by grouping the files into solutions and projects.

  • The editor window (center), where you'll likely spend a majority of your time, displays file contents. This is where you can edit code or design a user interface such as a window with buttons and text boxes.

Editions

Visual Studio is available for Windows and Mac. Visual Studio for Mac has many of the same features as Visual Studio 2019, and is optimized for developing cross-platform and mobile apps. This article focuses on the Windows version of Visual Studio 2019.

There are three editions of Visual Studio 2019: Community, Professional, and Enterprise. See Compare Visual Studio IDEs to learn about which features are supported in each edition.

Some of the popular features in Visual Studio that help you to be more productive as you develop software include:

  • Squiggles and Quick Actions

    Squiggles are wavy underlines that alert you to errors or potential problems in your code as you type. These visual clues enable you to fix problems immediately without waiting for the error to be discovered during build or when you run the program. If you hover over a squiggle, you see additional information about the error. A light bulb may also appear in the left margin with actions, known as Quick Actions, to fix the error.

  • Refactoring

    Refactoring includes operations such as intelligent renaming of variables, extracting one or more lines of code into a new method, changing the order of method parameters, and more.

  • IntelliSense

    IntelliSense is a term for a set of features that displays information about your code directly in the editor and, in some cases, write small bits of code for you. It's like having basic documentation inline in the editor, which saves you from having to look up type information elsewhere. IntelliSense features vary by language. For more information, see C# IntelliSense, Visual C++ IntelliSense, JavaScript IntelliSense, and Visual Basic IntelliSense. The following illustration shows how IntelliSense displays a member list for a type:

  • Search box

    Visual Studio can seem overwhelming at times with so many menus, options, and properties. The search box is a great way to rapidly find what you need in Visual Studio. When you start typing the name of something you're looking for, Visual Studio lists results that take you exactly where you need to go. If you need to add functionality to Visual Studio, for example to add support for an additional programming language, the search box provides results that open Visual Studio Installer to install a workload or individual component.


    Press Ctrl+Q as a shortcut to the search box.

  • Live Share

    Collaboratively edit and debug with others in real time, regardless of what your app type or programming language. You can instantly and securely share your project and, as needed, debugging sessions, terminal instances, localhost web apps, voice calls, and more.

  • Call Hierarchy

    The Call Hierarchy window shows the methods that call a selected method. This can be useful information when you're thinking about changing or removing the method, or when you're trying to track down a bug.

  • CodeLens

    CodeLens helps you find references to your code, changes to your code, linked bugs, work items, code reviews, and unit tests, all without leaving the editor.

  • Go To Definition

    The Go To Definition feature takes you directly to the location where a function or type is defined.

  • Peek Definition

    The Peek Definition window shows the definition of a method or type without actually opening a separate file.

Install the Visual Studio IDE

In this section, you'll create a simple project to try out some of the things you can do with Visual Studio. You'll use IntelliSense as a coding aid, debug an app to see the value of a variable during the program's execution, and change the color theme.

To get started, download Visual Studio and install it on your system. The modular installer enables you to choose and install workloads, which are groups of features needed for the programming language or platform you prefer. To follow the steps for creating a program, be sure to select the .NET Core cross-platform development workload during installation.

When you open Visual Studio for the first time, you can optionally sign in using your Microsoft account or your work or school account.

Create a program

Let's dive in and create a simple program.

  1. Open Visual Studio.

    The start window appears with various options for cloning a repo, opening a recent project, or creating a brand new project.

  2. Choose Create a new project.

    The Create a new project window opens and shows several project templates. A template contains the basic files and settings needed for a given project type.

  3. To find the template we want, type or enter .net core console in the search box. The list of available templates is automatically filtered based on the keywords you entered. You can further filter the template results by choosing C# from the Languagedrop-down list. Select the Console App (.NET Core) template, and then choose Next.

  4. In the Configure your new project window, enter HelloWorld in the Project name box, optionally change the directory location for your project files, and then choose Create.

    Visual Studio creates the project. It's a simple "Hello World" application that calls the Console.WriteLine() method to display the literal string "Hello World!" in the console (program output) window.

    Shortly, you should see something like the following:

    The C# code for your application shows in the editor window, which takes up most of the space. Notice that the text is automatically colorized to indicate different parts of the code, such as keywords and types. In addition, small, vertical dashed lines in the code indicate which braces match one another, and line numbers help you locate code later. You can choose the small, boxed minus signs to collapse or expand blocks of code. This code outlining feature lets you hide code you don't need, helping to minimize onscreen clutter. The project files are listed on the right side in a window called Solution Explorer.

    There are other menus and tool windows available, but let's move on for now.

  5. Now, start the app. You can do this by choosing Start Without Debugging from the Debug menu on the menu bar. You can also press Ctrl+F5.

    Visual Studio builds the app, and a console window opens with the message Hello World!. You now have a running app!

  6. To close the console window, press any key on your keyboard.

  7. Let's add some additional code to the app. Add the following C# code before the line that says Console.WriteLine("Hello World!");:

    C#복사

    Console.WriteLine("\nWhat is your name?"); var name = Console.ReadLine();

    This code displays What is your name? in the console window, and then waits until the user enters some text followed by the Enter key.

  8. Change the line that says Console.WriteLine("Hello World!"); to the following code:

    C#복사

    Console.WriteLine($"\nHello {name}!");
  9. Run the app again by selecting Debug > Start Without Debugging or by pressing Ctrl+F5.

    Visual Studio rebuilds the app, and a console window opens and prompts you for your name.

  10. Enter your name in the console window and press Enter.

  11. Press any key to close the console window and stop the running program.

Use refactoring and IntelliSense

Let's look at a couple of the ways that refactoring and IntelliSense can help you code more efficiently.

First, let's rename the name variable:

  1. Double-click the name variable to select it.

  2. Type in the new name for the variable, username.

    Notice that a gray box appears around the variable, and a light bulb appears in the margin.

  1. Select the light bulb icon to show the available Quick Actions. Select Rename 'name' to 'username'.

    The variable is renamed across the project, which in our case is only two places.

  1. Now let's take a look at IntelliSense. Below the line that says Console.WriteLine($"\nHello {username}!");, type DateTime now = DateTime..

    A box displays the members of the DateTime class. In addition, the description of the currently selected member displays in a separate box.

  2. Select the member named Now, which is a property of the class, by double-clicking on it or pressing Tab. Complete the line of code by adding a semi-colon to the end.

  3. Below that, type in or paste the following lines of code:

    C#복사

    int dayOfYear = now.DayOfYear; Console.Write("Day of year: "); Console.WriteLine(dayOfYear);


    Console.Write is a little different to Console.WriteLine in that it doesn't add a line terminator after it prints. That means that the next piece of text that's sent to the output will print on the same line. You can hover over each of these methods in your code to see their description.

  4. Next, we'll use refactoring again to make the code a little more concise. Click on the variable now in the line DateTime now = DateTime.Now;.

    Notice that a little screwdriver icon appears in the margin on that line.

  5. Click the screwdriver icon to see what suggestions Visual Studio has available. In this case, it's showing the Inline temporary variable refactoring to remove a line of code without changing the overall behavior of the code:

  6. Click Inline temporary variable to refactor the code.

  1. Run the program again by pressing Ctrl+F5. The output looks something like this:

Debug code

When you write code, you need to run it and test it for bugs. Visual Studio's debugging system lets you step through code one statement at a time and inspect variables as you go. You can set breakpoints that stop execution of the code at a particular line. You can observe how the value of a variable changes as the code runs, and more.

Let's set a breakpoint to see the value of the username variable while the program is "in flight".

  1. Find the line of code that says Console.WriteLine($"\nHello {username}!");. To set a breakpoint on this line of code, that is, to make the program pause execution at this line, click in the far left margin of the editor. You can also click anywhere on the line of code and then press F9.

    A red circle appears in the far left margin, and the code is highlighted in red.

  2. Start debugging by selecting Debug > Start Debugging or by pressing F5.

  3. When the console window appears and asks for your name, type it in and press Enter.

    The focus returns to the Visual Studio code editor and the line of code with the breakpoint is highlighted in yellow. This signifies that it's the next line of code that the program will execute.

  4. Hover your mouse over the username variable to see its value. Alternatively, you can right-click on username and select Add Watch to add the variable to the Watch window, where you can also see its value.

  5. To let the program run to completion, press F5 again.

To get more details about debugging in Visual Studio, see Debugger feature tour.

Customize Visual Studio

You can personalize the Visual Studio user interface, including change the default color theme. To change to the Dark theme:

  1. On the menu bar, choose Tools > Options to open the Options dialog.
  1. On the Environment > General options page, change the Color theme selection to Dark, and then choose OK.

    The color theme for the entire IDE changes to Dark.

To learn about other ways you can personalize the IDE, see Personalize Visual Studio.

Next steps

Explore Visual Studio further by following along with one of these introductory articles:

If you're ready to dive into more coding, one of the following language-specific quickstarts is a good next step:

See also

피드백

사업개요

중소기업 인식개선 및 청년취업 유인을 위해 청년구직자를 대상으로 스마트공장 구축기업에서의 일자리 체험 기회 제공 및 채용연계 등을 지원해 드리는 사업입니다.
 
☞ 구인수요가 있는 스마트공장 구축 중소기업
 
☞ 현장실습 후 채용연계 지원

지원분야 및 대상

ㅇ 지원대상

- 기업 : 구인수요가 있는 스마트공장 구축 중소기업(300~600개사)

  * 현장체험 후 정규직 전환 예정 기업(구직자) 우선 지원, 기업 당 최대 3명
  ** 소재·부품전문기업 등의 육성에 관한 특별조치법 제2조 및 시행규칙 제2조에 따른 ‘소재·부품’ 관련 산업 우선 지원

- 참여자 : 만 34세 이하 청년구직자(600명 내외)

  * 군 복무 기간 산입 시 최대 만 39세 이하

지원조건 및 내용

ㅇ 사업기간 : 2019. 8. ~ 2019. 12.


ㅇ 지원내용

- 청년구직자에게 스마트공장 직무교육(2일 이내) 진행 후, 스마트공장 구축 중소기업과 매칭하여 현장체험 진행

 * 참여기업에 참여자 당 훈련수당 월 60만원(최대 3개월) 보조

- 멘토링 활동 등을 통한 현장실습(최대 3개월) 실시, 현장실습 종료 후 채용연계 지원

지원절차

모집·매칭

직무교육

협약체결

현장체험

채용연계

사후관리

신청방법 및 서류

ㅇ 신청 방법 : 이메일 접수

- E-mail : job@kosmes.or.kr

* 이메일 송부 시 제목을 “스마트공장 구축기업 청년체험단 참여신청”으로 작성 
 
ㅇ 신청 서류 : 신청서 등

가점우대제도

ㅇ 해당없음

주관기관 담당부서 및 담당자

주관기관담당부서전화번호홈페이지URL담당자명담당자 이메일

중소벤처기업진흥공단 기업인력애로센터
1588-3001 http://www.kosmes.or.kr/
사업담당자
job@kosmes.or.kr

접수기관 담당부서 및 담당자

접수기관담당부서전화번호홈페이지URL담당자명담당자 이메일

중소벤처기업진흥공단 기업인력애로센터
1588-3001 http://www.kosmes.or.kr/
사업담당자
job@kosmes.or.kr

기타사항

※ 자세한 사항은 중소벤처기업부(www.mss.go.kr) → 알림소식 → 법령정보 → 훈령ㆍ예규ㆍ고시ㆍ공고 참조(☞바로가기)

문의처

ㅇ 중소벤처기업진흥공단 기업인력애로센터

- Tel : 1588-3001, E-mail : job@kosmes.or.kr


한 줄 설명

풍신 1주년 기념 업데이트! 매1매1이 축제! ONE없이 즐겨보자!


풍신 1주년 기념 업데이트! 매1매1이 축제! ONE없이 즐겨보자!

<홍보 방향> - 풍신 1주년 기념을 강조해 주세요. - 사전예약 패키지 내 50만원 이상의 보상 아이템 구성이라는 점을 강조하여 참여를 유도해 주세요. - 초대 이벤트 참여를 독려해주세요. - 초대왕 외에도 2명 이상 초대 시 경품 추첨의 기회가 있다는 점을 설명해주세요.

appfing.com

홍보 가이드

<홍보 방향>
- 풍신 1주년 기념을 강조해 주세요.
- 사전예약 패키지 내 50만원 이상의 보상 아이템 구성이라는 점을 강조하여 참여를 유도해 주세요.
- 초대 이벤트 참여를 독려해주세요.
- 초대왕 외에도 2명 이상 초대 시 경품 추첨의 기회가 있다는 점을 설명해주세요.

캠페인 소개

[ 사전예약 ] 풍신 1주년 대축제!

- ONE없이 다 주는 사전 예약! 

  사전예약 기간 : 2019.08.14 ~ 2019.08.27


[ 이벤트 . 1 ] 1년에 단 한번뿐인 축제!

- 풍신 1주년 축제에 초대 합니다! 

  초대기간 : 2019.08.14 ~ 2019.08.27 


[ 이벤트 . 2 ] 1st Anniversary - THE 풍신 AWARDS

- 1년동안 풍신을 사랑해주신 여러분들께! 

  에어팟부터 워터파크 이용권까지 다 드립니다!

  발표일자 : 2019.08.28 풍신 업데이트 이후


[ 이벤트 . 3 ] 풍신 유저님께 드리는 SPECIAL EVENT

- 1주년 기념 3배 이벤트와 YB쿠폰 대기 중! 

한 줄 설명

새로운 갤럭시노트10 사전예약 출시, 갤럭시워치 액티브2 사은품 무료증정 혜택


새로운 갤럭시노트10 사전예약 출시, 갤럭시워치 액티브2 사은품 무료증정 혜택


appfing.com

캠페인 소개

- 갤럭시노트10 사전예약 홍보가이드


새로운 갤럭시노트10 사전예약 출시, 갤럭시워치 액티브2 사은품 무료증정 혜택.


갤럭시노트10 사전예약을 엠엔프라이스(mnprice.com)에서 신청하고 가장 먼저 받아보세요.

갤럭시노트10 사전예약을 통해 혜택 / 증정 새로운 소식을 빠르게 전해드립니다.


※ 갤럭시노트10 사전예약 엠엔프라이스 혜택 안내


■ 혜택 1. 새로운 갤럭시노트10 프리미엄 사은품 혜택

   지금까지 이런 프리미엄 사은품은 없었다. 100% 선택 증정

    - 번호이동

         1. 닌텐도 스위치

         2. 갤럭시워치 액티브2 (블루투스 모델)

         3. 갤럭시A50 (직구, 듀얼유심)

         4. 와사비망고 UHD 4K 43인치 TV

         5. 삼성전자 2세대 듀얼 무선충전기+갤럭시 버즈


    - 기기변경

         1. 갤럭시워치 액티브2(블루투스 모델)

         2. 와사비망고 UHD 4K 43인치 TV

         3. 갤럭시 A30(직구, 듀얼유심)

         4. 갤럭시 A20(직구, 듀얼유심)

         5. 삼성전자 2세대 듀얼 무선충전기+갤럭시 버즈


■ 혜택 2. 갤럭시노트10 사전예약 선착순 즉시 결제 할인 무이자 혜택 지원

   -  즉시 결제 최대 할인 25% + 22개월 무이자 혜택 + 25% 요금할인 까지. (선착순 500명)


■ 혜택 3. 특별한 G포인트로 내마음대로 사은품 선택 증정!

   - 50여개 사은품을 내맘대로 선택이 가능한 G포인트 증정


■ 혜택 4. 100%증정, 갤럭시노트10 사전예약 구매고객 삼성전자 제조사 사은품 및 통신사 사은품

   - 추후 공개 COMMING SOON!


■ 혜택 5. 1+1 둘이 사면 더 좋다  프리미엄 사은품 증정

    - 1+1= 2명이상 개통시 BIG BIG 사은품 혜택 (지인/가족 2명이상 개통시)

        1. 오큘러스 퀘스트 VR (64G) 2019 NEW

        2. 소니 플레이스테이션4(PS4) PRO

        3. 삼성전자 무풍 큐브 공기청정기(14평형)

        4. 유로휠 EURO8 전동 킥보드

        5. LG전자 프라엘 더마 LED 마스크

        6. LG 시네빔 PH550S


■ 이벤트 - 엠엔프라이스(mnprice.com) 갤럭시노트10 사전예약 다양한 이벤트

       1. [이벤트1] 카톡 리뉴얼 기념 엠엔프라이스가 쏜닭! 100명에게 치킨을 쏩니다. (개통자 추첨)

       2. [이벤트2] 카카오톡 플친 갤럭시노트10 2만원 할인쿠폰 증정!

       3. [이벤트3] 스타벅스 무료음료권 & 텀블러 300명 증정. (개통자 추첨)

       4. [이벤트4] 엠엔프라이스 무한적립 추천존 오픈 추천하고 경품, 용돈 받아가세요!

       5. [이벤트5] 매번 찾아오는 갤럭시노트10 사고싶은 이유? 버거먹어 (댓글 이벤트) 롯데리아 불고기버거 셋트 증정.


사전예약 10년 노하우 회원 15만명의 파워!

갤럭시노트10 사전예약은 엠엔프라이스에서!

note10.co.kr

한 줄 설명

배틀그라운드 모바일 X Meen&백승훈 [시즌2 - 바이러스 인펙션]


배틀그라운드 모바일 X Meen&백승훈 [시즌2 - 바이러스 인펙션]


appfing.com

캠페인 소개

<홍보방향 >

- '배틀그라운드 모바일'에 08/15 업데이트 된 신규 좀비 모드 '바이러스 인펙션'을  

  <통>, <독고>, <블러드 레인>의 인기 웹툰 작가인 민 &백승훈 작가가 웹툰으로 그려냈습니다. 


- 해당 웹툰을 08/16 '배틀그라운드 모바일' 공식 페이스북 페이지에 오픈하였습니다. 

  해당 웹툰 중 일부(1화 분량)을 홍보자료로 활용하여 전체 분량을 '배틀그라운드 모바일' 

  공식 페이스북 페이지에 방문하여 볼 수 있도록 홍보 부탁 드립니다. 


- 해당 웹툰이 08/19 '배틀그라운드 모바일' 공식 유튜브 채널에 무빙툰으로 제작되어 오픈된다는 점도 안내 부탁 드립니다.


- 홍보성으로 보이지 않도록 자연스러운 홍보 부탁 드립니다.


<타겟> 

- 게임 선호층, 액션/느와르 웹툰 선호층


<캠페인 소개>

"좀비들과의 처절한 사투는 끝났고, 이제는 치킨을 위해 살아남을 때다!" 라고  

생각했던 <통>,<독고> 그리고 <블러드 레인>의 멤버들.


자기장에 쫓겨 도착한 그 곳에서 끝난 줄 알았던 좀비의 공포가 다시 시작된다! 

meen&백승훈 X 배틀그라운드 모바일 콜라보 콘텐츠 2탄!!  


신규 감염모드 '바이러스 인펙션' 예고 동영상: https://youtu.be/sSVA1Jp9_Xc  

신규 감염모드 '바이러스 인펙션' 패치노트 프리뷰 동영상: https://youtu.be/lh88WTnU9gA?t=23 (00:23 ~ 02:45 구간)

The Application base class offers the following features, which are exposed in your projects default App subclass:

  • A MainPage property, which is where to set the initial page for the app.
  • A persistent Properties dictionary to store simple values across lifecycle state changes.
  • A static Current property that contains a reference to the current application object.

It also exposes Lifecycle methods such as OnStart, OnSleep, and OnResume as well as modal navigation events.

Depending on which template you chose, the App class could be defined in one of two ways:

  • C#, or
  • XAML & C#

To create an App class using XAML, the default App class must be replaced with a XAML App class and associated code-behind, as shown in the following code example:

XAML복사

<Application xmlns="http://xamarin.com/schemas/2014/forms" xmlns:x="http://schemas.microsoft.com/winfx/2009/xaml" x:Class="Photos.App"> </Application>

The following code example shows the associated code-behind:

C#복사

public partial class App : Application { public App () { InitializeComponent (); MainPage = new HomePage (); } ... }

As well as setting the MainPage property, the code-behind must also call the InitializeComponent method to load and parse the associated XAML.

MainPage property

The MainPage property on the Application class sets the root page of the application.

For example, you can create logic in your App class to display a different page depending on whether the user is logged in or not.

The MainPage property should be set in the App constructor,

C#복사

public class App : Xamarin.Forms.Application { public App () { MainPage = new ContentPage { Title = "App Lifecycle Sample" }; // your page here } }

Properties dictionary

The Application subclass has a static Properties dictionary which can be used to store data, in particular for use in the OnStart, OnSleep, and OnResume methods. This can be accessed from anywhere in your Xamarin.Forms code using Application.Current.Properties.

The Properties dictionary uses a string key and stores an object value.

For example, you could set a persistent "id" property anywhere in your code (when an item is selected, in a page's OnDisappearingmethod, or in the OnSleep method) like this:

C#복사

Application.Current.Properties ["id"] = someClass.ID;

In the OnStart or OnResume methods you can then use this value to recreate the user's experience in some way. The Propertiesdictionary stores objects so you need to cast its value before using it.

C#복사

if (Application.Current.Properties.ContainsKey("id")) { var id = Application.Current.Properties ["id"] as int; // do something with id }

Always check for the presence of the key before accessing it to prevent unexpected errors.

 참고

The Properties dictionary can only serialize primitive types for storage. Attempting to store other types (such as List<string>) can fail silently.

Persistence

The Properties dictionary is saved to the device automatically. Data added to the dictionary will be available when the application returns from the background or even after it is restarted.

Xamarin.Forms 1.4 introduced an additional method on the Application class - SavePropertiesAsync() - which can be called to proactively persist the Properties dictionary. This is to allow you to save properties after important updates rather than risk them not getting serialized out due to a crash or being killed by the OS.

You can find references to using the Properties dictionary in the Creating Mobile Apps with Xamarin.Forms book chapters 6, 15, and 20, and in the associated samples.

The Application class

A complete Application class implementation is shown below for reference:

C#복사

public class App : Xamarin.Forms.Application { public App () { MainPage = new ContentPage { Title = "App Lifecycle Sample" }; // your page here } protected override void OnStart() { // Handle when your app starts Debug.WriteLine ("OnStart"); } protected override void OnSleep() { // Handle when your app sleeps Debug.WriteLine ("OnSleep"); } protected override void OnResume() { // Handle when your app resumes Debug.WriteLine ("OnResume"); } }

This class is then instantiated in each platform-specific project and passed to the LoadApplication method which is where the MainPage is loaded and displayed to the user. The code for each platform is shown in the following sections. The latest Xamarin.Forms solution templates already contain all this code, preconfigured for your app.

iOS project

The iOS AppDelegate class inherits from FormsApplicationDelegate. It should:

  • Call LoadApplication with an instance of the App class.

  • Always return base.FinishedLaunching (app, options);.

C#복사

[Register ("AppDelegate")] public partial class AppDelegate : global::Xamarin.Forms.Platform.iOS.FormsApplicationDelegate // superclass new in 1.3 { public override bool FinishedLaunching (UIApplication app, NSDictionary options) { global::Xamarin.Forms.Forms.Init (); LoadApplication (new App ()); // method is new in 1.3 return base.FinishedLaunching (app, options); } }

Android project

The Android MainActivity inherits from FormsAppCompatActivity. In the OnCreate override the LoadApplication method is called with an instance of the App class.

C#복사

[Activity (Label = "App Lifecycle Sample", Icon = "@drawable/icon", Theme = "@style/MainTheme", MainLauncher = true, ConfigurationChanges = ConfigChanges.ScreenSize | ConfigChanges.Orientation)] public class MainActivity : FormsAppCompatActivity { protected override void OnCreate (Bundle bundle) { base.OnCreate (bundle); global::Xamarin.Forms.Forms.Init (this, bundle); LoadApplication (new App ()); // method is new in 1.3 } }

Universal Windows project (UWP) for Windows 10

The main page in the UWP project should inherit from WindowsPage:

XAML복사

<forms:WindowsPage ... xmlns:forms="using:Xamarin.Forms.Platform.UWP" ...> </forms:WindowsPage>

The C# code behind construction must call LoadApplication to create an instance of your Xamarin.Forms App. Note that it is good practice to explicitly use the application namespace to qualify the App because UWP applications also have their own App class unrelated to Xamarin.Forms.

C#복사

public sealed partial class MainPage { public MainPage() { InitializeComponent(); LoadApplication(new YOUR_NAMESPACE.App()); } }

Note that Forms.Init() must be called from App.xaml.cs in the UWP project.

For more information, see Setup Windows Projects, which includes steps to add a UWP project to an existing Xamarin.Forms solution that doesn't target UWP.

Xamarin.Forms App 클래스

Application 기본 클래스에서 제공하여 프로젝트의 기본 App 하위 클래스에 공개되는 기능은 다음과 같습니다.

  • MainPage 속성 - 앱의 초기 페이지를 설정할 위치입니다.
  • 영구 Properties 사전 - 수명 주기 상태 변경 전반에 걸친 단순 값을 저장합니다.
  • 정적 Current 속성 - 현재 애플리케이션 개체에 대한 참조를 포함합니다.

또한 수명 주기 메서드(예: OnStart, OnSleep, OnResume)와 모달 탐색 이벤트도 제공합니다.

선택한 템플릿에 따라 App 클래스는 다음 두 가지 방법 중 하나로 정의할 수 있습니다.

  • C# 또는
  • XAML 및 C#

XAML을 사용하여 App 클래스를 만들려면 다음 코드 예제와 같이 기본 App 클래스를 XAML App 클래스 및 연결된 코드 숨김으로 바꿔야 합니다.

XAML복사

<Application xmlns="http://xamarin.com/schemas/2014/forms" xmlns:x="http://schemas.microsoft.com/winfx/2009/xaml" x:Class="Photos.App"> </Application>

다음 코드 예제에서는 연결된 코드 숨김을 보여 줍니다.

C#복사

public partial class App : Application { public App () { InitializeComponent (); MainPage = new HomePage (); } ... }

MainPage 속성을 설정할 것뿐만 아니라 코드 숨김에서 InitializeComponent 메서드를 호출하여 연결된 XAML을 로드하고 구문 분석해야 합니다.

MainPage 속성

Application 클래스의 MainPage 속성은 애플리케이션의 루트 페이지를 설정합니다.

예를 들어 사용자가 로그인했는지 여부에 따라 다른 페이지를 표시하는 논리를 App 클래스에 만들 수 있습니다.

MainPage 속성은 App 생성자에 설정해야 합니다.

C#복사

public class App : Xamarin.Forms.Application { public App () { MainPage = new ContentPage { Title = "App Lifecycle Sample" }; // your page here } }

속성 사전

Application 하위 클래스에는 데이터를 저장하는 데 사용할 수 있는 정적 Properties 사전이 있으며, 특히 OnStart, OnSleep  OnResume 메서드에서 사용할 수 있습니다. 이 하위 클래스는 Application.Current.Properties를 사용하여 Xamarin.Forms 코드의 어느 곳에서나 액세스할 수 있습니다.

Properties 사전은 string 키를 사용하고 object 값을 저장합니다.

예를 들어 다음과 같이 코드의 아무 곳에서(항목이 선택된 경우 페이지의 OnDisappearing 메서드 또는 OnSleep 메서드에서) 영구 "id"속성을 설정할 수 있습니다.

C#복사

Application.Current.Properties ["id"] = someClass.ID;

그러면 OnStart 또는 OnResume 메서드에서 이 값을 사용하여 사용자의 환경을 어떤 방식으로든 다시 만들 수 있습니다. Properties 사전에는 object가 저장되므로 사용하기 전에 해당 값을 캐스팅해야 합니다.

C#복사

if (Application.Current.Properties.ContainsKey("id")) { var id = Application.Current.Properties ["id"] as int; // do something with id }

예기치 않은 오류를 방지하기 위해 키에 액세스하기 전에 키가 있는지 항상 확인하세요.

 참고

Properties 사전은 스토리지에 대한 기본 형식만 직렬화할 수 있습니다. 다른 형식(예: List<string>)을 저장하려고 하면 자동으로 실패할 수 있습니다.

지속성

Properties 사전은 자동으로 디바이스에 저장됩니다. 사전에 추가된 데이터는 애플리케이션이 백그라운드에서 반환되거나 다시 시작된 후에도 사용할 수 있습니다.

Xamarin.Forms 1.4는 Application 클래스에 SavePropertiesAsync() 추가 메서드를 도입했으며, 이 메서드는 Properties 사전을 사전에 유지하기 위해 호출할 수 있습니다. 이렇게 하면 중요한 업데이트 후에 충돌로 인해 직렬화되지 않거나 OS에서 종료하는 위험을 감수하지 않으면서 속성을 저장할 수 있습니다.

Xamarin.Forms를 사용하여 모바일 애플리케이션 만들기 서적의 6, 15  20 장과 관련 샘플에서 Properties 사전 사용에 대한 참조를 찾을 수 있습니다.

애플리케이션 클래스

참조에 대한 완전한 Application 클래스 구현은 아래와 같습니다.

C#복사

public class App : Xamarin.Forms.Application { public App () { MainPage = new ContentPage { Title = "App Lifecycle Sample" }; // your page here } protected override void OnStart() { // Handle when your app starts Debug.WriteLine ("OnStart"); } protected override void OnSleep() { // Handle when your app sleeps Debug.WriteLine ("OnSleep"); } protected override void OnResume() { // Handle when your app resumes Debug.WriteLine ("OnResume"); } }

그러면 이 클래스가 각 플랫폼별 프로젝트에서 인스턴스화되고, MainPage가 로드되어 사용자에게 표시되는 LoadApplication 메서드로 전달됩니다. 각 플랫폼에 대한 코드는 다음 섹션에서 보여 줍니다. 최신 Xamarin.Forms 솔루션 템플릿에는 이 코드가 모두 포함되어 있으며 애플리케이션에 맞게 미리 구성되어 있습니다.

iOS 프로젝트

iOS AppDelegate 클래스는 FormsApplicationDelegate에서 상속됩니다. 수행하는 작업은 다음과 같습니다.

  • App 클래스의 인스턴스를 사용하여 LoadApplication을 호출합니다.

  • 항상 base.FinishedLaunching (app, options);를 반환합니다.

C#복사

[Register ("AppDelegate")] public partial class AppDelegate : global::Xamarin.Forms.Platform.iOS.FormsApplicationDelegate // superclass new in 1.3 { public override bool FinishedLaunching (UIApplication app, NSDictionary options) { global::Xamarin.Forms.Forms.Init (); LoadApplication (new App ()); // method is new in 1.3 return base.FinishedLaunching (app, options); } }

Android 프로젝트

Android MainActivity는 FormsAppCompatActivity에서 상속됩니다. OnCreate 재정의에서 LoadApplication 메서드가 App 클래스의 인스턴스를 사용하여 호출됩니다.

C#복사

[Activity (Label = "App Lifecycle Sample", Icon = "@drawable/icon", Theme = "@style/MainTheme", MainLauncher = true, ConfigurationChanges = ConfigChanges.ScreenSize | ConfigChanges.Orientation)] public class MainActivity : FormsAppCompatActivity { protected override void OnCreate (Bundle bundle) { base.OnCreate (bundle); global::Xamarin.Forms.Forms.Init (this, bundle); LoadApplication (new App ()); // method is new in 1.3 } }

Windows 10용 UWP(유니버설 Windows 프로젝트)

UWP 프로젝트의 기본 페이지는 WindowsPage에서 상속됩니다.

XAML복사

<forms:WindowsPage ... xmlns:forms="using:Xamarin.Forms.Platform.UWP" ...> </forms:WindowsPage>

C# 코드 숨김 생성은 LoadApplication을 호출하여 Xamarin.Forms App의 인스턴스를 만들어야 합니다. UWP 애플리케이션에도 Xamarin.Forms와 관련이 없는 자체의 고유한 App 클래스가 있으므로 애플리케이션 네임스페이스를 사용하여 App을 한정하는 것이 좋습니다.

C#복사

public sealed partial class MainPage { public MainPage() { InitializeComponent(); LoadApplication(new YOUR_NAMESPACE.App()); } }

UWP 프로젝트의 App.xaml.cs에서 Forms.Init()가 호출되어야 합니다.

자세한 내용은 UWP를 대상으로 하지 않는 기존 Xamarin.Forms 솔루션에 UWP 프로젝트를 추가하는 단계가 포함된 Windows 프로젝트 설정을 참조하세요.

+ Recent posts